

You’ll build a code-compliant pergola by starting with proper foundation anchorage—either 36-48 inch post holes or concrete-mounted standoffs rated for local wind loads. Use pressure-treated 6×6 posts, 2×8 headers, and 2×6 purlins spaced 16-24 inches on-center, securing all connections with galvanized structural screws through pre-drilled pilot holes. Always call 811 before excavation and maintain plumb tolerances within 1/4-inch for long-term structural integrity. The following sections break down each construction phase with precise measurements and fastening specifications.
Key Takeaways
- Gather essential tools including circular saw, cordless drill, carpenter’s level, speed square, and tape measure for precise assembly.
- Use 6×6 posts, 2×8 headers, 2×6 purlins, and 2×4 stringers with galvanized hardware for durable construction.
- Anchor posts 36-48 inches deep with concrete achieving 3,000 PSI strength, ensuring plumb within 1/4-inch tolerance.
- Predrill pilot holes before driving structural screws through headers into posts to prevent splitting and ensure stability.
- Space purlins 16-24 inches on-center and add cross-bracing to prevent warping and distribute loads effectively.
Why A Pergola Transforms Your Outdoor Living Space
A pergola delivers measurable improvements to your outdoor living area through strategic shade deployment, structural definition, and vertical growing capacity.
You’ll achieve functional outdoor aesthetics while creating designated zones for entertaining and dining activities.
The pergola benefits extend beyond visual enhancement—you’re establishing a framework that supports climbing vegetation, reducing direct solar exposure by 30-50% depending on purlin spacing.
Pergolas provide functional shade reduction of 30-50% while creating structural support for climbing plants and vertical garden integration.
This structure defines property boundaries, increases usable square footage, and provides architectural continuity between your dwelling and landscape.
You’re implementing a cost-effective solution that enhances property value while maintaining code-compliant construction standards for long-term durability and performance.
For those seeking a more refined alternative, a premium hardtop gazebo offers superior weather protection and year-round functionality compared to traditional pergolas.
Understanding The True Cost Of Building Your Own Pergola

When evaluating material expenditures for pergola construction, you’ll find that dimensional lumber pricing directly correlates with square footage and structural specifications.
A thorough cost breakdown reveals:
- 10×10 structures: Several hundred dollars utilizing treated lumber
- 16×16 configurations: $350-$400 for complete material procurement
- Anchor systems: $25-$30 per concrete plate anchor (4 required)
Effective budget planning necessitates accounting for 6×6 posts, 2×8 headers, 2×6 purlins, and 2×4 stringers.
You’ll achieve significant savings compared to prefabricated alternatives while maintaining code-compliant structural integrity. Treated lumber offers ideal cost-to-durability ratios versus premium cedar options. For a low-maintenance alternative that combines durability with aesthetic appeal, consider aluminum pergolas which provide exceptional longevity without the ongoing treatment requirements of wood structures.
Recommended Products
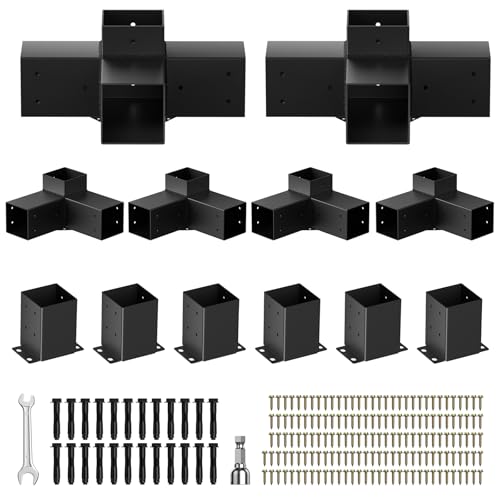
3-Way & 4-Way Pergola Brackets Kit: Upgraded 3-way & 4-way right-angle pergola brackets boost pergola stability in harsh weather. Designed for 4"x4" (actual 3.5"x3.5") sizes, the 4x4 pergola brackets are weather-resistant and sturdy, with no need to worry about storm or wind damage

Fits 3.5x3.5 Inch Wood Posts: This 4x4 pergola kit is ideal for building a pitched-roof pergola and fits actual wood sizes of 3.5 x 3.5 inches (92 x 92 mm), compatible with both softwood and hardwood

Superior Quality Materials: This 4x4 pergola brackets feature a 90° right angle gusset plate design and weather-proof performance and a stable frame,so you do not have to worry about the attack and damage to storms and wind.
Choosing The Right Materials For Durability And Value

Material selection fundamentally determines your pergola’s serviceability timeline and maintenance requirements over its operational lifespan.
Pressure-treated lumber offers superior weather resistance at economical price points, typically $350-$400 for 16×16 structures. You’ll need 6×6 posts for load-bearing capacity, 2×8 or 2×10 header boards for structural integrity, 2×6 purlins, and 2×4 top stringers.
While cedar represents sustainable materials, it’s cost-prohibitive and susceptible to dimensional instability. Treated lumber provides excellent durability-to-cost ratios.
For those seeking alternative solutions, metal raised beds offer a modern approach to garden structures with enhanced longevity and minimal maintenance requirements. Complement structural components with galvanized hardware and concrete anchors ($25-$30 each) for code-compliant installations ensuring long-term structural performance against environmental stressors.
Recommended Products

Heavy Duty Structural Holding Power - #14 exterior deck screws designed for strong fastening in decking, fencing, framing, and other outdoor wood construction.

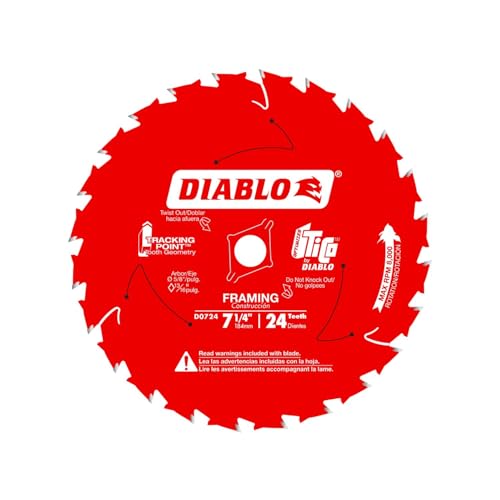
Advanced Tracking Point Tooth Design - Provides unmatched cutting precision, delivering straight cuts while extending blade life up to 5X longer than standard framing blades.
Essential Tools You’ll Need For Construction

Having specified your material requirements, you’ll now require specific power and hand tools to execute proper construction techniques.
Professional-grade measuring tools guarantee accurate cuts and proper alignment throughout assembly.
You’ll need:
- Circular saw or miter saw for cutting posts, headers, purlins, and stringer boards to precise dimensions
- Cordless drill with adequate torque for driving screws and installing hardware connections
- Carpenter’s level, speed square, and tape measure for maintaining structural plumb and square
Power tools expedite construction while maintaining code-compliant standards.
For detailed pruning work and finishing touches on wooden elements, electric pruning shears can provide precision cuts for climbing vines and decorative plants integrated into your pergola design.
Quality equipment guarantees clean cuts, secure fastening, and professional-grade results for long-term structural integrity.
Recommended Products

[Dimensions] 6.1 inch hole saw (155mm hole cutter) 83 mm overall length, 1.2 mm blade thickness, 10 mm shaft diameter, 6 mm center drill diameter.

15+1 Torque Settings for Precision & Control: Powered by a high-speed motor and delivering up to 280 in-lb of torque, the AVID POWER drill driver handles screws and holes in wood, plastic, and metal with ease. The 20V kit includes a 15+1 position clutch for precise torque adjustment, helping prevent material damage or over-tightening. It supports drilling up to 20mm in wood and 10mm in steel plate—a reliable, user-friendly drill for everyday home projects

【Versatile for Any Outdoor Setting】 Artpuch Outdoor Roller Shades are the perfect fit for a wide range of outdoor spaces, including porches, gazebos, patios, backyards, decks, balconies, pergolas, and more. Tailor the ambiance of your chosen scene with ease and style, from tranquil mornings with a cup of coffee to vibrant garden parties or cozy family dinners.
Breaking Down The Key Components Of A Pergola

Understanding the structural anatomy of a pergola guarantees code-compliant construction and long-term durability.
Your structure comprises four 6×6 treated posts, four header boards (2×8 or 2×10 lumber), purlins (2×6 lumber), and top stringer boards (2×4 lumber).
Various pergola styles require different spacing configurations—purlin placement determines shade density. Design options include notched purlins that eliminate hardware requirements by fitting directly over headers.
Header boards provide primary load-bearing capacity, while purlins guarantee structural integrity. Top stringers, secured perpendicular to purlins, prevent warping and complete the framework.
Each component integrates systematically to achieve ideal stability and aesthetic appeal. Enhance your finished pergola with pergola lighting kits to extend usability into evening hours while creating an inviting outdoor ambiance.
Preparing And Cutting Your Lumber Before Assembly

Streamline your construction process by cutting all lumber components to specification before initiating assembly operations. This approach guarantees dimensional accuracy and prevents workflow interruptions during construction.
Pre-cutting all lumber to exact specifications before assembly ensures precise dimensions and eliminates costly delays during construction.
Essential lumber selection tips and cutting techniques:
- Verify grade stamps on treated lumber for structural compliance; select straight, defect-free boards to minimize warping issues.
- Measure twice and execute cuts using a miter saw for precision angles on headers, purlins, and stringers.
- Pre-drill fastener locations to prevent splitting and guarantee proper load distribution across connection points.
Consider using cedar lumber for your pergola construction, as it offers natural durability and aesthetic appeal for outdoor structures.
Proper preparation greatly reduces installation time while maintaining code-compliant structural integrity throughout your pergola framework.
Step-By-Step Assembly Of Posts And Header Boards

With lumber components cut to specification, begin assembly by positioning two 6×6 treated posts parallel on a level work surface, maintaining the exact spacing that matches your pergola’s width dimension.
Verify post alignment using a measuring tape at multiple points.
Position the 2×8 or 2×10 header board perpendicular across post tops, guaranteeing equal overhang on both ends.
Predrill pilot holes through headers into posts to prevent splitting.
Drive 6-inch structural screws through headers into post ends, installing three fasteners per connection point.
This ground-level assembly method guarantees header stability while simplifying construction logistics and maintaining square geometry throughout installation.
Cedar raised garden kits utilize similar assembly techniques with cedar lumber components that ensure durability and longevity in outdoor construction projects.
Installing Purlins And Top Stringer Boards For Structural Integrity

Once the header board assemblies are erected and secured, install 2×6 purlins perpendicular to the headers at predetermined intervals that correspond with your shade requirements.
Cut notches in each purlin to fit precisely over the header boards, eliminating fastener requirements while maintaining structural integrity. Purlin spacing typically ranges from 16 to 24 inches on-center, depending on desired shade density.
- Position purlins with notched ends seated flush against header surfaces
- Verify stringer alignment using a straightedge before fastening components
- Secure 2×4 top stringer boards perpendicular to purlins with galvanized deck screws at 16-inch intervals
This cross-bracing configuration prevents warping and guarantees load distribution. For outdoor projects, consider incorporating garden storage bench solutions to keep your tools and materials organized within easy reach of your work area.
Securing Your Pergola To Concrete Or Ground Surfaces

Proper foundation anchorage determines your pergola’s longevity and resistance to lateral forces from wind loads and seismic activity.
Foundation anchorage isn’t optional—it’s your primary defense against wind uplift and lateral loads that compromise structural integrity.
You’ll implement pergola anchoring techniques by selecting post bases rated for your structural loads—typically 6×6 adjustable standoffs or epoxy-set anchors.
Concrete surface preparation requires abrading the substrate to CSP-3 profile, removing all contaminants, and ensuring moisture content below 4%.
For non-concrete installations, you’ll excavate post holes to 36-48 inches depth, extending below frost line per local code.
Install posts plumb within 1/4-inch tolerance, backfilling with compacted aggregate and Portland cement concrete mix achieving minimum 3,000 PSI compressive strength.
Consider integrating rain barrel systems into your landscape design to manage stormwater runoff around pergola foundations and improve site drainage.
Critical Safety Checks And Design Considerations

Before commencing excavation activities, you’ll contact your regional utility notification center—dialing 811 in North America—to initiate subsurface utility engineering (SUE) locates for electric, natural gas, telecommunications, water, and sanitary sewer infrastructure.
Your structural considerations must address:
- Wind resistance: Anchor assemblies must withstand regional wind loads per local building codes
- Design aesthetics: Scale proportions relative to existing architectural features and landscape elements
- Solar orientation: Position structure to optimize shade patterns based on seasonal sun angles
Integrate climbing vegetation supports and verify anchorage methods meet jurisdictional requirements. Consider installing smart irrigation controllers nearby to maintain healthy plant growth on and around your pergola structure.
Proper planning guarantees code-compliant, durable construction that harmonizes with your outdoor environment.
Adding Personal Touches With Plants And Decorative Elements

After establishing structural integrity and regulatory compliance, you’ll enhance your pergola’s aesthetic value through strategic horticultural and ornamental installations.
Your plant selection should prioritize climbing varieties like wisteria, clematis, or grapevines that provide functional shade while complementing your landscape design. Position specimens to optimize growth patterns along posts and purlins.
Incorporate decorative lighting fixtures rated for outdoor exposure, ensuring electrical installations meet NEC standards. Consider low-voltage LED systems for energy efficiency and longevity.
Install hardware using corrosion-resistant fasteners to maintain structural integrity. These enhancements transform your pergola from basic shelter into an integrated outdoor living space.
Frequently Asked Questions
Do I Need a Building Permit to Construct a Pergola?
You’ll need to check your local building regulations before construction, as permit requirements vary by jurisdiction. Contact your municipality’s building department to understand the specific permit process and code requirements for your pergola project.
How Long Does It Take to Build a Pergola From Start to Finish?
Your construction timeline depends on project planning, site preparation, and assembly complexity. You’ll typically complete a 10×10 pergola in one weekend—approximately 8-16 hours—with proper material preparation and adequate manpower for structural installation.
Can a Pergola Be Attached to an Existing House Structure?
Yes, you can attach a pergola to your house structure. You’ll need proper attachment methods like ledger boards and lag bolts, while addressing design considerations including load-bearing capacity, drainage, and local building code compliance requirements.
What Maintenance Does a Pergola Require After Construction?
Like a well-oiled machine, your pergola needs minimal upkeep. You’ll establish a cleaning schedule to remove debris, perform seasonal checks on fasteners and wood condition, and reapply sealant every two to three years for longevity.
How Do I Protect My Pergola From Weather Damage and Rot?
You’ll protect your pergola by using rot-resistant materials like treated lumber and applying weatherproofing techniques including water-repellent sealants, proper drainage design, and regular inspections to prevent moisture accumulation and structural deterioration.
Conclusion
You’ve now got the blueprint to build your own outdoor sanctuary—consider it your architectural promised land. Unlike purchasing pre-fab structures at premium prices, you’re creating a code-compliant installation using proper post anchoring, structural-grade fasteners, and engineered load distribution. Execute each phase methodically: verify post plumb, maintain purlin spacing at 16″ o.c., and confirm all connections meet local building codes. Your pergola won’t just stand—it’ll endure seasons like the pillared structures of antiquity, transforming your landscape investment.


